Modelled Surfaces

To get a good surface toolpath, you must start with a good surface. If your surfaces were created in a software program different from the software you are using to generate the toolpaths, it will be well worth your time to do some checks on the surfaces provided.

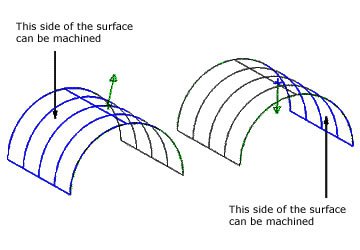
You need to determine the direction of the “positive surface normal.” A surface normal is a vector (direction) that is perpendicular to the tangent plane of a surface at the point of tangency. It is an attribute that is attached to each individual surface and not to a specific part shape. In the diagrams below, the green arrows represent the vector that is perpendicular to the surface at the point where the vector intersects the surface, and they point in the direction of the positive surface normal.

Each surface has two normal vectors, which point in opposite directions. One is referred to as the positive (front, outward) direction; the other as the negative (back, inward) direction. The positive surface normal side of the surface should always be the side you are machining. When a surface is created, the default positive normal direction is based on the relative directions of the curves defining the surface. 

This becomes a problem if you are machining a model that has several surfaces, with some positive normals pointing inward and some outward. The normal direction must be flipped so all the positive normals point in the same directions. In the graphic below, the surface on the left has the positive surface normal pointing outward. The surface on the right has the positive surface normal pointing inward.

It is important to know the surface normal direction, because it affects the ways in which offset surfaces are created, curves are projected onto surfaces, and fillet surfaces are created between two sets of surfaces.

Also, check the surface creation tolerance or maximum surface deviation tolerance. These will determine the maximum distance by which a surface can be separated from its generating curve. If the tolerance is too large, the final machined surface may not be desirable.

Tip: I usually set my maximum surface deviation tolerance set to 0.00005″ (0.0013mm).